@Severence thanks again for the tips. Battery info still shows 1000mah design capacity. My resistors match yours. Changed the bq and still the same. Currently discharging the battery again but it takes ages to go flat in hekate.
Emmc shows all the partitions and can mount them. Also read write tests are fine. Reflashed firmware and still the same.
Will see if discharging and recharging makes a difference but not hopeful.
It’s really annoying as did boot from hetake when the battery was detected properly in battery info and now after swapping resistors round, joycons work but doesn’t boot. Makes no sense to me.
If I get no where with it now, may have to just start replacing caps and resistors round those areas and see.
Would m92 have anything to do with battery capacity? Would have thought it was just down to the fuel gauge but when all else fails
Nah it won’t make a difference, it was more just to check if it resolved the reported capacity
Might be a good idea to boot L4t Ubuntu intead (as you can fast charge, and it will draw far more current for discharge)
It will also provide the oppurtunity to check you max CPU and GPU buck regs are outputting the needed rails and that the CPU/GPU is functionaning properly
M92 is USB management essentially, so I suppose in theory it could be the problem, though it was working earlier, L4T Ubuntu should offer further confirmation here, if it fast charges then it’s unlikely
tried l4t, it shows the splash screen then goes black and is detected again in rcm mode
trying stock or cwf it goes black but is not detected in rcm needing power cycling
trying fusee.bin shows atmosphere splash screen and freezes on it needing power cycling
battery info showing 34.9% at the moment with voltage of 3755mv, if I plug the charger in it jumps straight to 3945mv, dont know if thats normal but everything seems to point to the info from the fuel guage is reporting wrong not allowing enough power to boot. I am probably way off but cannot for the lifr of me figure this out.
Last time I had a fuel gauge issue I got through an full set of 5 chips that all were just dead on arrival. When I ordered some more the first one worked fine. May be worth getting some more from a different seller?
Regardless of whether you have fuel gauge issues (which I don’t think you do) L4T Ubuntu would still boot, which implies more serious issues, possibly CPU/GPU buck regs or SoC/Ram issues
Try putting very light pressure on the SoC and Ram and attempt to boot stock OS or L4T Ubuntu and see if anything changes
Yeah, last lot I got from Aliexpress were all used, pulled from donors and obviously reballed, think I got x10 and all but 1 worked in my case, I wouldn’t order them outside the legit channels anymore such as mouser, farnell etc.
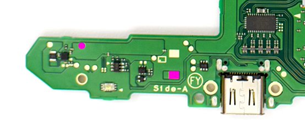
just checking capacitors and am getting diode readings of around .356 voltage drop on the 3 capacitors circling the pink spot in the below image which I believe is the 4v constant line. On another board I get .560 voltage drop. Could this imply something at all?
scrap that, readings match Calvins. Readings no longer match other board now anyway as bq and fuel gauge no longer on it. Just swapped over a second fuel gauge and about to test
Replacement fuel gauge shows the same max 1000mah capacity. It did go a bit over that last night to around 1135mah but after power off and back on its 1000mah again.
Took sons switch apart and tried with that battery, same result. Tried my battery with his switch and it worked fine so at least ruled out battery and hopefully fuel gauge as replaced twice with same result.
Tried to look at the data sheet to see if I could spot something that may cause it but I don’t have enough understanding to follow it properly.
It booted before and only really been messing around with the bq, left rail and fuel gauge area since then so would assume its something in that vacinity that’s causing it to not recognise the battery correctly so may have to just go around swapping resistors, capacitors and ic’s in that area unless you can think of anything else worth trying?
Don’t think any of your current issues are fuel gauge related provided your reball was good, as I mentioned though L4T Ubuntu would still boot regardless of fuel gauge condition (provided it’s not shorted out)
I’d try putting sligh pressure on the Ram/SoC and see if anything changes when attempting to boot stock/CFW or L4T Ubuntu via Hekate
Just to verify, you’ve ran L4T ubtuntu before right? I just want to verify this isn’t a setup issue or anything?
Yep ran ubunto once on it before and connected to WiFi but since formatted the sd as fat32 so installed again. Formatted sd card in the partition tool allocating 32gb to the Linux partition, placed files back on and the Linux files then installed with partition tool. It shows up in other config and gets to the splash screen then reboots to rcm (auto rcm is still enabled).
I did try applying pressure but will try again and see if anything has changed
I see, might be worth taking diode/resistance measurments relative to ground at the surrounding fuel gauge components… unlikely but perhaps via damage/open in this area…though whether you’d see this in diode/resistance relative to ground is another matter.
Failing that, if it were me, I’d be swapping the two Max CPU and GPU buck regulators as that would be the other culprit for black screen no boot and then failing that the primary culprits would be SoC or Ram.
I have been testing resistance to ground values against my other board now that I have put the bq and fuel gauge back on it and the only difference I can find is that 4v line is 3.5k on the other board and around 350k on this one.
I tried reflowing everything in the area and no change on that, nothing boots from hekate and Linux still restarts the switch after the splash screen… However, after trying this time to load ofw from hekate, the fuse count has now gone to 12 so it definitely tried to boot, it just can’t. Battery is still showing 100mah too.
Tomorrow I will check resistance around the max chips but really don’t want to change them if I can help it, still relatively inexperienced with bga so not very confident in doing that yet.
By the sounds of it your prior resistor swaps etc have resolved the fuse not burning issue, it’s a shame as I expect that the console would have booted normally if not for the latest issue
I’d probably disregard this reading, from memory you’d get approx 10K or greater in one polarity and in the hundreds of K to M in the reverse polarity relative to ground on the SYS rail
@Severence thanks for pointing me towards the max77621. I damaged one replacing it but second time round and a lot of patience I managed to get it swapped and had no shorts so bit the bullet and tested it. I had little to no hope considering the 2 steps forward, 1 step back I’ve had though this whole repair journey but I couldn’t believe it. Linux and hos booted from hekate so disabled autorcm and powered it off then back on…
It booted
I am still waiting for a joycon connector to arrive as the clip came off, so can’t set up the switch to see if it’s banned or not but once that arrives I’ll know for sure.
Thank you all for the help. Without this forum and the helpful users I would have had no hope
I’d give the board an ultrasonic or if you haven’t got one give it an IPA bath and a gentle scrub with a toothbrush as those resistors which we suspect were open earlier etc woul be consistent with a liquid damage case and that may also be the reason the max77621 failed later, so would be a good preemptive measure (we don’t want anything else to fail later on)
Also, if you haven’t done it already, I’d swap the 6 pin LED/light sensor, otherwise your auto brightness will probably not function properly, you’ll probably want to pinch it from your donor by heating the opposing side of the board and then hand solder it onto your working board
Does your donor not have a JC connector you can pinch? the left and right are the same connector
No ultrasonic but do intend on giving it a good IPA bath when the connector is on. Don’t have a spare as only one was any good on the donor and already used that, unfortunately with trying to get the joycon working I removed and reinserted the cable so many times while testing it that it just failed.
Hopefully it will arrive in the next couple days then I can fully test
New connector on and everything seems fine. Updated the switch through nintendo after factory reset, signed in and can download games from the eshop so looks like I was super lucky it wasn’t banned.
Going to give it a good clean and put it back together for the last time, never thought this day would come lol